This article was sourced from Education Designed
A crucial aspect of any summer experience is connecting with not only co-workers at your organization, but also with individuals outside of your organization who may be a part of your industry or share another connection to your personal and professional ambitions. The process of identifying, building, and maintaining these connections (what sociologists refer to as “weak ties”, as opposed to friends and mentors, which are termed “strong ties”) is commonly referred to as networking. Though often neglected, networking is crucial to your professional success. Networking can help you explore potential opportunities, better understand your industry or field, land a job, and serve as a source of support when you face challenges or setbacks.
To help organize the process of building out these networks during a summer internship or other experience, I have my students create a stakeholder map. Stakeholder maps are a design thinking tool that helps designers who might have an interest (i.e. a “stake”) in the process. In Life Design, the purpose of this stakeholder map is multifaceted. It can help you:
- identify those individuals, groups and organizations that engage (directly or indirectly) with your role or team.
- understand how your role both fits within a larger ecosystem and contributes to a larger project AND informs your own professional aspirations and personal mission.
- understand the group and organizational dynamics and structures within a professional ecosystem.
- Identify specific individuals with whom you can conduct a “Curiosity Conversation” to explore career pathways, grow your network of “strong” and “weak” ties, and design your way forward.
Stakeholder maps can be large and complex webs of information, but I’ve broken it down into four steps that can be completed during the summer. You can create your stakeholder map using Miro, Google Slides, or simple pen, paper, and sticky notes. Whatever method you choose, make sure you can rearrange and readjust as you build out your map.
STEP 1
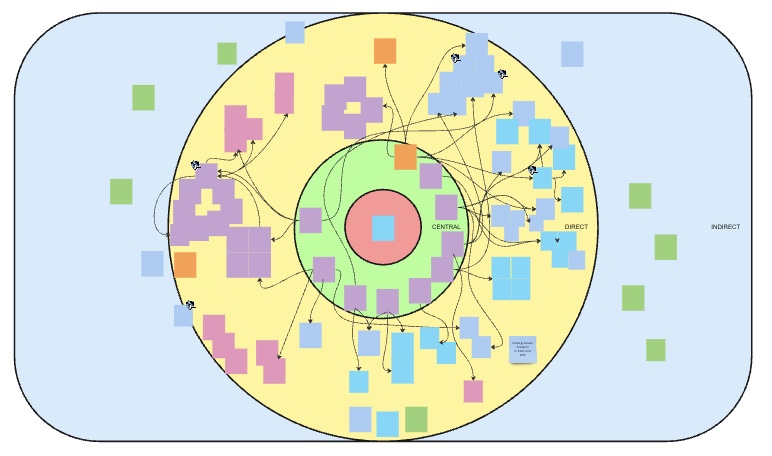
For this step, give yourself 10 minutes to list as many stakeholders (individuals, groups, and organizations) that you can think of in each of three groups a – Core, Direct, and Indirect – and add them to their respective areas on your map:
CORE – these are the individuals with whom you engage most frequently. These can be members of your team or lab, other interns (if you are part of a cohort), people in your specific location or with whom you share office space, etc.
DIRECT – these are the stakeholders with whom you and your team engage with on a direct basis. They could be specific individuals (which you can identify by name and position), but could also be offices (Marketing, Lab Safety), external organizations (NIH, Maryland State Government), or groups of people (patients, customers, students).
INDIRECT – this group would include any stakeholders that might somehow impacted by your work. This list can be quite broad, typically including professions (lawyers, journalists), organizations or groups of organizations (military, universities), or groups of people (parents, voters).
A few notes for STEP 1:
- Make sure you allow at least 10 minutes for this process. A good initial stakeholder map should have at least a couple, and ideally several, dozen entries.
- At this stage, don’t be too concerned if you can’t identify or name specific individuals. These details can be added later as you learn more.
- If you can’t figure out into which category to place a stakeholder, you can either put them on the edge between two categories or create separate entries for each area. You can refine and revise the placement later.
Below is an example of what your stakeholder map might look like at this stage:

STEP 2
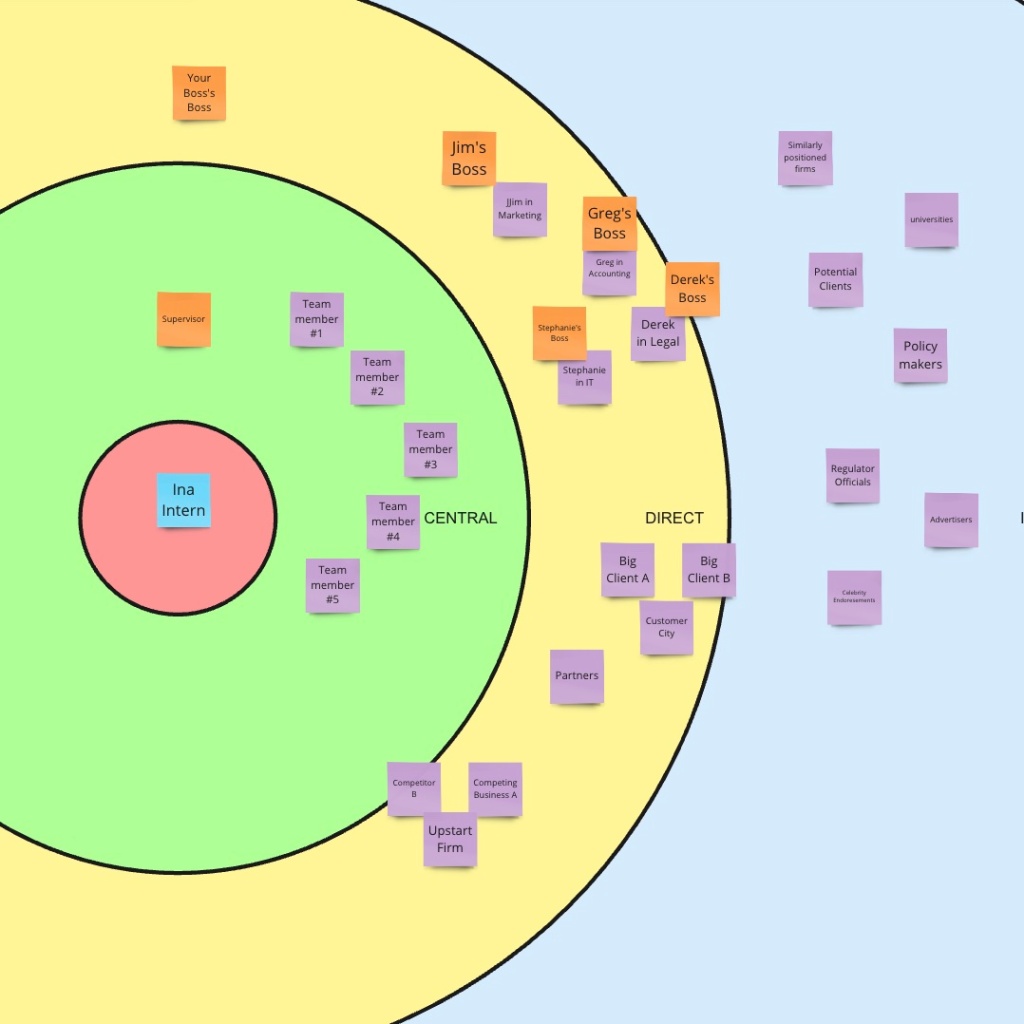
For this step, see if you can get your hands on the organizational chart for your company/area/division. Organization charts can take many forms (and if you are interested in learning more, this video provides a nice overview of some of the more common structures in the business world). Whether you are working at a multinational corporation with thousands of employees spread across the world or a small, local non-profit staffed by a handful of paid employees, your organization should have a formal structure that spells these relationships out out. Ideally, this org chart would be easily accessible, either through the organization’s website or through an internal company portal. If that’s the case, you are in luck. In other cases though, you may need to ask your supervisor/HR or even create your own.
With the Organizational Chart you have obtained/created, you hopefully now have a better sense of the specific individuals and offices that may engage directly with your team. Add those details (name, position, department, etc.) to your stakeholder map. At this stage – and depending on the size of your organization (and the completeness of your organizational chart) – you may not need to add every individual from your org chart to your stakeholder map.
Particularly in more hierarchical organizations, an organizational chart can also help you understand reporting lines and formal power structures. If possible, highlight not only your supervisor, but also their supervisor (and their supervisor’s supervisor, if possible).
At this point, your map might look something like this:
STEP 3
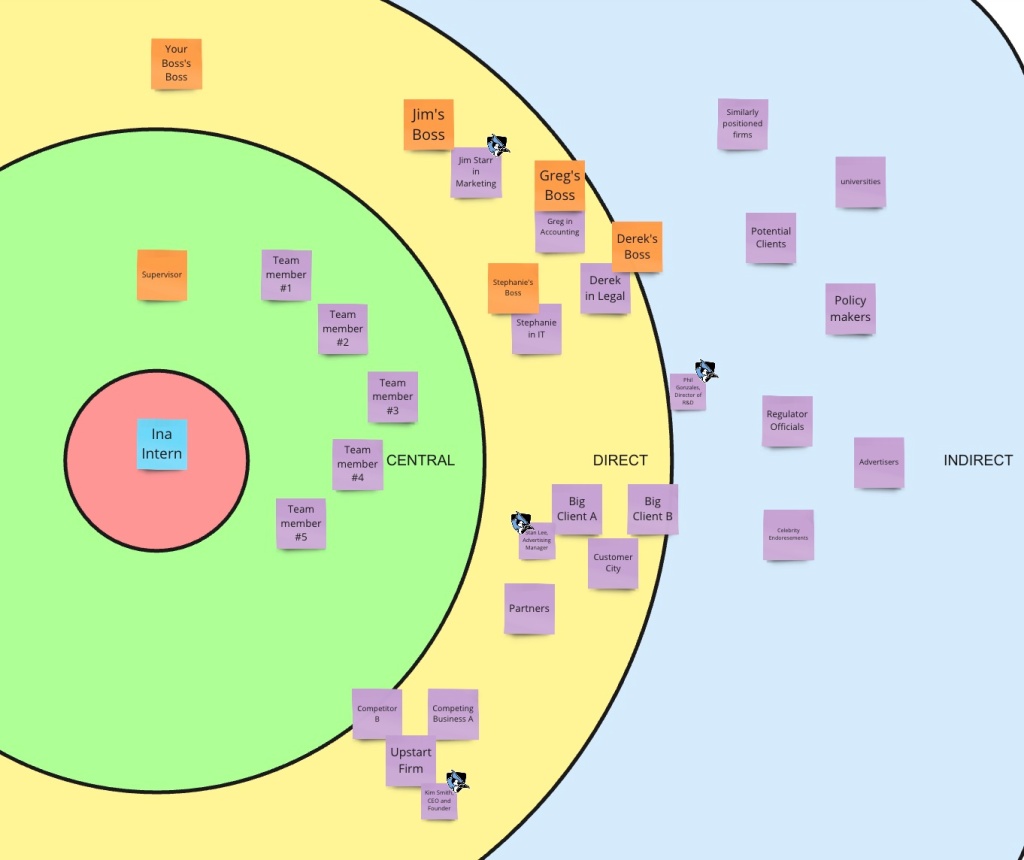
Linked in is a powerful tool for connecting with individuals at your company, in your industry, or within your broader geographic region. For those new to networking, it might be challenging reaching out to people with whom you share little to know connection. Connecting to alumni of your institution can help reduce this awkwardness – not only do you share something in common, but many alumni are eager to help out current students and share advice and connections.
The LinkedIn Alumni Tool makes finding alumni at your organization and within your stakeholder map easy. Using the alumni tool, go through an add as many alumni from your institution as possible to your stakeholder map. Include not only alumni that currently work at your organization, but also alumni who used to work at your org, alumni working at competitor or partner organizations, or any alumni that sound interesting and are part of the larger industry eco system. It can be helpful to add a notation to the person’s sticky note to indicate they are an alum (we use a Blue Jay sticker here at Hopkins).
STEP 4
Now that you have identified your key stakeholders as well as several alumni within both your organization and the industry ecosystem, you are ready to start networking. These networking conversations are typically referred to as informational interviews; at Hopkins we call them Curiosity Conversations. Regardless of what you call them, this is a chance for you to connect with people on your stakeholder map, learn more about their career path, their current role, how they engage with the work you are doing, and any other aspect of their life that you are genuinely curious about.
To help build out your stakeholder map, I recommend asking those with whom you conduct a curiosity conversation to identify the three or four individuals or offices with whom they engage regularly. Add these stakeholders to your map and draw a line between these stakeholders.
As you engage in Curiosity Conversations and learn more about your team, organization, and industry, you can continue to add information about individual stakeholders and the ways in which they connect. As you add these stakeholders and connections, your stakeholder map will develop into a rich web of relationships that will help you better understand your industry and your current (and possibly future) role within it.